

Compact Flash (CF), Secure Digital (SD), and MicroSD (Micro Secure Digital) cards have been around as convenient and compact ways to store and transport data on the go. Nowadays, our dependence on these compact storage cards has increased manifold. This reliance has birthed a new problem: what happens when our CF, SD, and MicroSD cards stop working and render all our precious data inaccessible?
There’s a good chance that your data is still there somewhere, awaiting an adept hand to locate it and kick-start its speedy recovery. Out of all the debilitating errors you can be faced with while using CF, SD, or MicroSD cards, one is a somewhat mysterious issue of your card showing the incorrect capacity for no apparent reason out of the blue.
Here are the examples of wrong capacities shown by cards
Lexar SD card shows up as 7.61GB
Sandisk SD card shows up as 30.6MB
In this article, we will tackle this specific issue and try to propose 2 basic resolutions for the same. Follow the steps intently, and you should be able to see yourself to a desirable conclusion soon.
Ways to fix CF, SD, or microSD card showing a wrong capacity
Your storage cards showing an incorrect capacity essentially means your cards are not working as they should and can be clubbed under the banner of “damaged” cards. The solution depends on your desired course of action. The 2 ways you can go if your CF, SD, and MicroSD cards show the wrong capacity and are thus, rendered incapable of their routine function are:
- Send it to a data recovery company
- Data restoration at home
It is essential to know that the former (Data Recovery) is best achieved if handled by a professional, while the latter also comes with an in-depth list of steps for you to follow. Now, let’s take a look at the two ways in detail.
Method 1: Send your card to a data recovery company
If your storage cards are showing the wrong capacities, you might feel it necessary to recover all the lost and inaccessible data. But the problem with this method is that it is not quite DIY-friendly. It is best to hand over your card to a data recovery company with ample experience, knowledge, and skills to recover lost data rapidly and safely. After all, you would not want to tamper with your precious data in the process of trying to recover it yourself.
A data recovery company can recover data from flash drives, SD cards, MicroSD cards, Cfast, CFexpress and CF cards that shows a wrong capacity. Make sure the data recovery company you choose has a crew of specialists possessing state-of-the-art flash memory data recovery technologies. A data recovery company will employ engineers who can use the latest methods and equipment, combined with their years of industry experience, to offer you safe and secure results.
Nowadays, most of the data recovery happens over mail, for the best data recovery company will only be located in your area. In this regard, most of the nearby offices you see listed on Google are virtual offices, with no physical building for you to walk into with your damaged card. So, it is best to prioritize the best company with ample experience at the cost of geographical convenience. Most customers mail their cards to the company, and with the undeniably loyal and dedicated services of shipping brands, your cards reach the company safely. All in all, it is a fool-proof process.
Method 2: Data recovery at home or DIY
If you think the data stuck in your damaged CF, SD, and MicroSD card is irreplaceable, you messed it up while you were trying to recover the data. Further, there’s a second method that entails your knowledge and effort. You can choose to recover the data from your storage cards and see the error correcting itself.
Below, we have listed the steps of DIY data recovery, should you wish to do it yourself at home.
Step 1: ensure your storage card is accessible
Your CF, SD, and MicroSD card has to be recognized by the computer to go ahead with the process. If it is not detected, the fault might lie with your port or card reader. For those using a card reader, try plugging it into another port or using another card reader entirely. Also, ensure the port is clear and has no dust or foreign objects coming in the way of the port connectors touching.
Step 2: Resolve logical issues with the card
The first logical issue to overcome is to make your files visible. Windows has a tendency to hide some files by default. Oftentimes, they are settings or configuration-related files. Here’s how to show all hidden files:
- Open ‘File Explorer’.
- Tap onto the ‘View’ tab, and select the down arrow on ‘Options’. Click on ‘Change Folder’ and search options.
- Click on the ‘View’ tab and choose the ‘Show Hidden Files, Folders, and Drives’ radio button. Tap on ‘Apply’, and then ‘OK’.
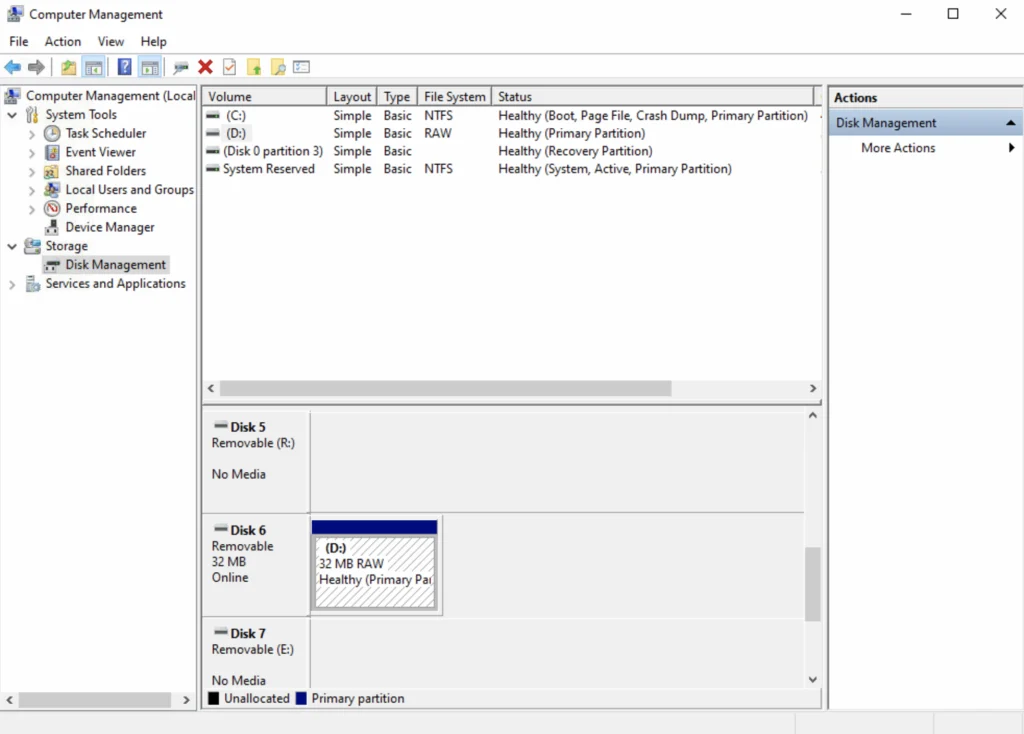
The next step is to assign a drive letter. If your card has its letter missing, Windows will not let you access it. But the good news is, you can manually assign your card a drive letter with Disk Management to recover your data. Here’s how to go about it:
- Right-click on the ‘Start’ button and tap on ‘Disk Management’.
- Right-click on the ‘Volume’ of your storage card and choose ‘Change Drive Letter and Paths’.
- Choose the volume and click on ‘Change’.
- Pick a new drive letter from the visible dropdown menu, tap on ‘OK’, and once again ‘OK’.
The next step is to update and reinstall your drivers since corrupt and outdated drivers prevent communication between your storage cards and the host OS. Here’s how to remedy that:
- Right-click on ‘Start’ and choose ‘Device Manager’.
- Expand the ‘Disk Drives’ drop-down menu and right-click on your card.
- Click on ‘Properties’. Beware that your card could have a different name in the ‘Device Manager’.
- In the new window, tap on the ‘Driver’ tab.
- Choose ‘Update Driver’, then search automatically for drivers to search for, download, as well as install new drivers. Once the drivers are updated, try to use your card again. If there is no update, click on ‘Close’ and continue to the next step.
- Click on ‘Uninstall Device’, and again click on ‘Uninstall’.
- Once the driver is uninstalled, remove the card and plug it back in to force the drivers into getting installed again.
Next in line is fixing the file structure. Use the CHKDSK command native to Windows and fix all drive-related file structure errors. This will effectively scan the drive for all potential issues and try to fix them automatically. Here’s how to go about it:
- Click on the Windows key + S and look for ‘Command Prompt’.
- Right-click and choose ‘Run as administrator’. If asked to allow access, choose ‘Yes’.
- Type in ‘chkdsk e: /f’and press ‘Enter’ but remember to replace the drive letter prior to the colon with your own drive letter.
Lastly, you need to format the storage card. Note that this process will delete any data currently in the card, but if done properly, it will ensure that most of your data still stands the possibility of being restored. Here’s how to go about it:
- Open ‘File Explorer’ and right-click on the card in the left-side panel. Choose ‘Format’.
- Ensure ‘Quick Format’ is ticked and then press ‘Start’.
- Once you receive the warning, tap on ‘OK’. Once the formatting is complete screen pops up, click on ‘OK’.
Step 3: Recover The lost/deleted data from your card
Do not have backup data? Use data recovery software designed to scan and recover all deleted data from your card. There is specific software for different cards and their corresponding data removal. As for how to connect the card to your computer, there are 2 main ways:
- Connect using a card reader
- Connect your device directly
Once it is connected to the computer, the recovery process is simple. One of the software you can use is Disk Drill. Here’s how to go about it:
- Download, install, and launch Disk Drill on your computer while your storage card is connected.
- Select your card in the list of all the visible devices and disks. Choose ‘Search for Lost Data’.
- Once the scan is finished, tap on ‘Review Found Items’.
- Choose the files you wish to recover by checking the boxes. Use the search box at the top to look by file type.
- Specify where you wish the files recovered to. It is best to choose a location that is not the same storage card.
- Click on ‘OK’.
That’s all you need to know about restoring your data from a damaged CF, SD, and MicroSD card showing incorrect capacity.
We recommend you hand it over to a data recovery company for the best results, but if you are confident in your skills, these steps might just help!